Flight Tactics
Tactical formation, hence flight tactics, are designed primarily to provide maximum mutual support and visual cross cover and retain maximum maneuverability for any air-to-air operation. In other words, tactical formations must provide both defensive and offensive capabilities. To provide these capabilities, a compromise between maximum mutual support and maximum maneuverability must be accomplished. The extent of the compromise will depend upon the type of mission flown. Though our mission – fighter-versus-bomber – emanates from a defensive situation, it is offensive in nature, in that the fighter is trying to destroy the bomber aircraft and is not primarily interested in providing security for himself.
The present concept of weapons employment (nuclear weapons) indicates that a given enemy will employ saturation-type tactics rather than a concentration of his force over a given target area. In other words, we may expect an attack force composed of single bombers dispersed over a wide area to strike at many targets. To counter this at all points, with four-ship scrambles, is not the answer, for we need a defense force numbering four times that of the strike force. We will be providing unnecessary security for the attacking fighters, as well as violating the dictum, “economy of force!” The problem remains – how shall we tactically deploy our fighters? A single fighter against a single bomber may appear the obvious answer, however, this is not so. When employing single fighters against a saturation-type raid, we would be assuming that each fighter would intercept its respective target without exception. There would be no ground aborts, air aborts, and/or possible fire control malfunctions. Result: some attacking bombers would get through our defenses. To preclude this possibility, we recommend a two-ship flight, as the basic unit, in a given fighter-versus-bomber intercept. The two-ship flight will be composed of a leader and his wingman.
In patrol position – prior to visually acquiring the bomber – the wingman should fly approximately 10 to 20 degrees back and approximately 1500 feet out. If he flies in much closer, too much time will be spent in flying formation and not enough in covering the leader and aiding him in visually acquiring the target. Flying too far out reduces maneuverability and may cause the wingman to become separated from his leader. When maneuvering, the wingman will play the outside as well as the inside of the turn, in a means of maintaining position. To do this effectively, he must maneuver through both the horizontal and vertical planes. This will allow him to reduce his horizontal turning component and thus maintain his relative position more easily. Procedure: When on the outside of a turn, the wingman should lower his nose and cross to the inside. If on the inside of the turn, and sliding forward, he would cross to the outside, slide high and fly in the plane of the leader. In other words, a wingman will fly a partial extended-low position, on the inside of the turn, and an extended high position – in the plane of the leader’s wing – on the outside of the turn. One thing for the wingman to remember: He must not cross in front of the leader. Instead, he should always maintain nose-tail separation, thus precluding the possibility of getting in the way of his leader.
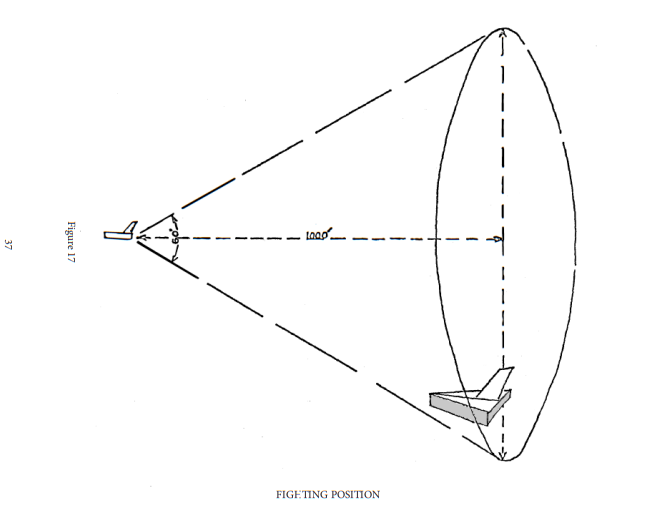
To reduce the bomber’s defense-area penetration, the flight must quickly maneuver from the approach to the best attack position. To do this, the flight must maneuver at max performance through both the vertical and horizontal planes. Under these circumstances, it would be quite difficult for the wingman to maintain the patrol position defined above. To enable the wingman to maintain a relative position during these maneuvers, we place him in a new position – the fighting position. Fighting Position: The wingman will fly within a 60° cone behind the leader at a distance of about 1000 feet. See figure 17. While flying in the cone, the wingman will maneuver through both the horizontal and vertical planes to maintain position. He will slide high when overshooting, and drop low to the inside when falling back. In other words, the maneuvering technique is basically the same as that of the patrol position.
If the leader is unable to deliver a successful attack against a bomber aircraft, the wingman will take over the lead position and initiate the attack. If neither the wingman nor the leader can deliver a successful missile attack, they will press in – with afterburner – and zoom above the target aircraft. From this position, they can execute coordinated barrel-roll attacks against the bomber aircraft. When the leader comes out of his roll, and into the firing position, the wingman may start down. When the leader slides to a new high position on the target, the wingman will be in the firing cone, and the cycle just repeats itself.
If the bomber is too high to permit successful employment of the barrel-roll attack, the fighters have no recourse. They will be forced to approach the target from below and from the six-o’clock position. If this tactic must be employed, it behooves the fighters to fire at the extreme range of the fire control system. Since the bomber is much larger, as compared to the fighter, their opportunity to secure a lethal burst is certainly as good if not better – than that of the defending bomber. The important thing to remember: the bomber must be destroyed, regardless of the tactics used, or the weapon employed.
